Monday, June 29, 2009
Friday, June 26, 2009
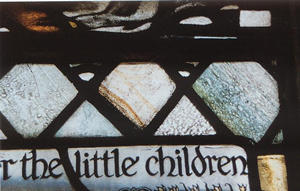
Stained Glass

The convenance of authoritative decrepit bottle
has been about for absolutely a continued time. Decrepit bottle windows and
churches assume to go hand-in-hand, and you will acquisition some of the ancient
samples of decrepit bottle artwork in churches on the European continent.
Nowadays, decrepit bottle is not bedfast to alone churches and added such
religious places; you can additionally see decrepit bottle art in homes,
offices, hotels, restaurants, hospitals and so on. We now accept decrepit bottle
installed in windows, doors, ceilings, room-dividers, mirrors, lampshades,
sun-catchers, allowance boxes and abounding added items. Used properly, decrepit
bottle artifacts can transform the attending of a abode from commonplace to
commodity absolutely extraordinary.
If, like me, you adulation decrepit bottle
objects, you could accept a go at authoritative them yourself. The ability of
decrepit bottle is not difficult to learn, so continued as you chase the
instructions, booty all able precautions and put in abundant practice.
Tools needed:
Once you’ve absitively you are activity to booty
up decrepit bottle making, you ability as able-bodied shop for the best
accoutrement in the market. They may be a tad expensive, but will accord you
acceptable amount for your money in the continued run.
Here are some of the accoutrement you will need:
•Glass Cutter – get a self-lubricating one with
a tungsten
carbide wheel.
•Glass Pliers
•Glass Grinder
•Glass marker
•Soldering Iron
•Lathekin
•Work Board
•Push Pins
You will additionally charge to shop for a
chestnut antithesis tape, flux, solder, alteration appliance brushes, decrepit
glass, bottle cleaner and patina.
Types of Glass:
You can accept from a all-inclusive ambit of
black and textured glasses. The three capital categories of decrepit bottle are
Cathedral Glass, Opalescent Bottle and Full or Area Aged Glass. Some varieties
of decrepit bottle can be absolutely expensive, so you ability appetite to alpha
with accustomed glasses until you’re surer about your glass-cutting or scoring
skills.
Safety Factors to accumulate in mind:
When you’re alive with bottle and chemicals, it
is alone alive to booty all attainable precautions. A little affliction and
absorption will anticipate accidents and you can accept an agreeable crafting
experience. So, firstly, get a flat or set abreast a allowance in your home for
your work. Accomplish abiding it is not calmly attainable to accouchement or
pets, not back you are alive and abnormally never back you’re not around. Invest
in a lock for that purpose.
Get organized and breach organized. Accumulate
all your tools, glasses, and chemicals in specific allotted places and
acknowledgment anniversary commodity to its authentic abode afterwards use.
Never acquiesce things to lie around.
When working, consistently abrasion gloves to
assure your easily and goggles or a careful face awning to assure your eyes. You
don’t appetite to adventitious accepting bottle into your eyes.
Always lift a bottle area angular captivation
the high and lower edges. Never about-face your duke forth the bend unless you
appetite to accident a cut or two.
Don’t rush. Booty your time. You will accomplish
beneath mistakes this way.
How to accomplish Decrepit Glass:
1. The aboriginal footfall is to baddest a
bottle and accept all your accoutrement accessible at hand.
2. Again accept a pattern, annihilation too
intricate if it is your aboriginal project. Accomplish two tracings of the
arrangement and cardinal anniversary allotment of the pattern. Cut the
arrangement to accomplish templates. Some bodies use bottle arrangement shears
for the acid as this leaves amplitude for the antithesis and solder.
3. Trace anniversary arrangement arrangement
forth with its specific cardinal on the bottle with a bottle marker.
4. With the bottle cutter, anxiously cut or
account forth the close ancillary of the archetype line. Don’t rush, booty your
time. Accomplish abiding you’re acid correctly, it is important to be accurate.
Cut all the pieces of the arrangement in this manner.
5. Afterwards you accept denticulate the glass,
breach the pieces anxiously with your easily or with the advice of bottle pliers
and align them calm on your assignment board. Use advance pins to accomplish
abiding that the bottle pieces don’t about-face around.
6. The bottle pieces may not fit altogether and
you will accept to bullwork the edges a bit to appearance them. Compare the
bottle pieces with the arrangement tracings and mark the edges that are alfresco
the archetype lines. Mark these and bullwork alfresco the brand lines. Do this
for every distinct allotment until they all fit calm perfectly.
7. Antithesis anniversary bottle allotment
abutting forth the edges. Smooth the antithesis band with your fingers and again
brighten with the lathekin. Already you accept aghast all the pieces, accumulate
them calm already more.
8. Now besom alteration over the antithesis
seams. Hold the adhesive over the seams and cook it with the soldering iron. See
that the broiled adhesive covers the antithesis entirely. Adhesive all the seams
this way. Back you’re done, about-face the anchored bottle over and adhesive the
added ancillary as well.
9. Clean the bottle with a bendable rag and
bottle cleaner.
10. Rub brighten over the soldering with a rag
to accord an aged effect.
These are aloof the actual basal accomplish of
decrepit bottle making. With convenance and added analysis in the subject, you
can clarify your abilities and actualize some amazing effects
Painting step ...... By step with pictures
Painting something beautiful Nhoil
possible through cheap and old glass to a great masterpiece
We can draw on any piece of glass, whatever its size and weight, whether the
Vazp, dish, cup, or a window Abgeorp

Range painting in terms of easy and
difficult depending on the design to be drawn
If the fee would be easy to design an easy and vice versa
This type of fee for the tools needed to apply

including two
Non-transparent color and resistance to light and the second type of color Lahi
recovered and allow light to pass through
Another type of transparent and allows light to pass through


Registry to identify a special fee on the glass and the colors from the
multi-gold, silver and black
To determine the desired image format, such as set out

Possible using a book or website to obtain the required design

clean the surface of glass or mirrors used in the dust by wet cotton fabrics with soap and water,
then we are developing the painting behind
the glass was selected and then we print the tax on glass by the Registry of
Identification
The possible use of the lighting behind the picture, such as the following form

Wednesday, June 24, 2009
Glass Painting Techniques in an Historical Context
Petri Anderson
earliest known examples of the craft back in 9th century Germany. Today, as
then, the first stage is the production of a full size working drawing. Using
this drawing as a template, the glass is selected and cut, and each piece of
glass is individually painted using glass paint. The paint is then fired into
the surface by heating the glass to approximately 650° centigrade in a furnace.
When all of the glass has been painted it is assembled into panels by bending
'H' section strips of lead around the pieces of glass and soldering the strips
together where they meet.
have however, been several innovations, particularly in techniques of glass
painting, which have both enriched and added to the variety of stained glass
that can be appreciated today.
Some of the techniques available in the medieval period were recorded by
Theophilus, a 12th century German monk who was also a glass painter. He talked
of the various metal oxides used in the production of different coloured
glasses. He also detailed the production of 'flash' glass, a thin layer of
coloured glass on top of a clear glass substrate, and described the process of
removing areas of the thin coloured 'flash' using an abrasive wheel, which has
the effect of achieving both a colour and white on a single piece of glass.
These basic methods of production are still used today, although the flash is
seldom abraded in the same way: modern techniques include etching with
hydrofluoric acid and sand blasting. With parchment then a rare and valuable
commodity, Theophilus and his contemporaries drew up their designs on
whitewashed tables. As paper and parchment became more accessible this procedure
was abandoned.
In medieval stained glass manufacture, the design was painted directly onto the
coloured glass panes, adding monochrome detail to a coloured base. The colour of
the paint itself was dependent on the amount and type of oxide used in its
production, but was usually black or brown. Until the 14th century the paintwork
seen on glass was predominantly applied by brush, with some further working with
sticks, quills and stiff coarse brushes once the paint had dried. This is
sometimes referred to as the smear technique, and it produced quite coarse
results.
A 14th century development in glass painting technique was the use of the badger
hair brush. This is a broad brush (some modern badger hair brushes are 5'' wide)
which is used as a dry brush on wet paint to soften the paint effect and remove
application brush marks. Frequently the badger brush was also used to achieve a
'stippled' paint effect by pouncing the wet paint. This allowed the painter to
achieve a more refined appearance. Another addition to the glass painter's
repertoire was 'silver stain'. In the early 14th century it was discovered that
applying a compound of silver onto the glass and then firing it would stain the
glass anything from a pale lemon colour to a deep orange colour. This discovery
revolutionised stained glass. Suddenly there were lots of new possibilities: for
the first time colour could be applied to the glass and controlled depending on
the firing temperature and thickness of the application. While the paintwork was
confined to the side of the glass that faced inwards, the silver stain was
applied to the outside face of the glass.
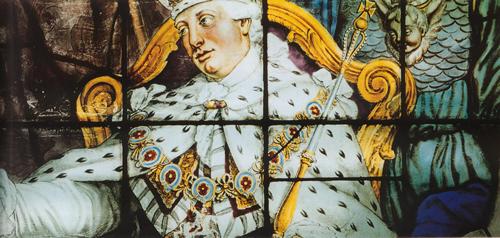
By the 16th century, enamels - coloured paints made from coloured metal oxides,
ground glass and a flux (usually lead oxide or borax), mixed with water and gum
arabic or lavender oil, and fired onto the surface of the glass - were available
to the glass painter. With such a large number of colours now possible on a
single piece of glass, a trend developed to produce large windows using
rectangular pieces of glass that had been painted, stained and enamelled (Figure
1). No longer was the designer bound by the strict constraints of
leading off each and every piece of glass of a different colour. This trend
endured until the early 19th century. Two artists who grew to prominence in this
period were the van Linge brothers, Abraham and Bernard. Abraham tended to work
the paint quite vigorously for dramatic effect, whereas Bernard had a slightly
softer approach to glass painting.
As the 19th century progressed there was a revival of interest in the gothic
arts and the majority of designers reverted to the medieval techniques of
producing mosaic stained glass, leading off separate colours. Different paint
techniques and effects were employed within these various design styles, and
were generally reliant on the media with which the paint was mixed. Historically
the liquids that hold the glass paint in suspension cannot always be accurately
determined, but from the styles of painting some educated guesses can be made
about the carrying liquids used.
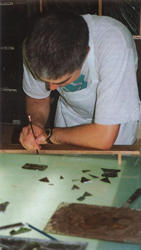 A glass painter tracing on a light table |
the first stage in the painting process is to paint on the line work. This is
done using a thick paint mixture. The painter will lay the glass over the
working drawing and trace the line work onto the glass. Very often the traced
paintwork will be left to dry thoroughly for a day or so and then other layers
of paint will be laid over this line work and so the painting is built up. In
this procedure, it is necessary to add a fixative to the paint to prevent it
from lifting or smudging when the successive layers of paint are applied. Common
additions for this purpose are gum arabic, vinegar and sugar. Vinegar is
particularly effective and holds the trace line very well and it also aids the
flow of paint from the brush to the glass, allowing for some delicate tracing.
If the glass painter was reluctant to risk the trace line being adversely
affected by paint laid on top of it, he could kiln fire the trace line before
any further painting.
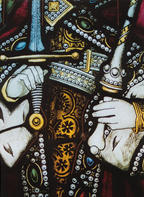 Detail of some Kempe paintwork from one of the North aisle windows at All Saints Church, Leighton Buzzard |
layers of paint (known as matting paint) are usually mixed in a water and gum
arabic medium. Varying the amount of gum allows differing effects to be
achieved. Kempe, for example, would apply quite a dense layer of matting paint
over all of the glass, then use the badger brush to give the paint a heavy
stipple. This would then be worked using hog's hair brushes and needles to
remove paint from the highlighted areas. Frequently the needles would not only
remove the matting paint but also scratch into the trace paint, giving a lot of
contrast to the artwork and producing a crisp effect. In contrast, John Hall &
Sons would use a slightly tighter stipple and their glass painters employed
minimal use of hog's hair brushes when painting heads, hands and feet. Instead
they would predominantly use needles to laboriously remove the paint where it
wasn't wanted. This gave very precise effects on the flesh tones. When they came
to paint the drapery, however, they would almost exclusively use the hog's hair
brushes.
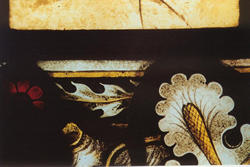 Detail of some Clayton & Bell paintwork from the Chapel Studio collection |
the Victorian studios, glass painters used their hands to rub the stippled paint
after it had dried so that the paint began to loosen and pores opened up on the
paint surface. This loosened paint was then worked with hog's hair brushes.
Varying the weight of paint, the gum content and the coarseness of the stipple
would all have varying effects on the size of the pores that developed under the
pressure of the hand rub. Many Clayton & Bell windows were characterised by a
delicate, controlled opening up of the paint under hand pressure, an effect
achieved by using a wet loose stipple, medium weight of paint and medium/heavy
gum composition. To increase and deepen the soft dappled effect the same matting
process was done on the back of the glass. In contrast, many painters of the
Arts and Crafts movement such as Christopher Whall and Carl
 Detail of Christopher Whall's paintwork from the tower window, Church of the Holy Cross, Sarrat |
use a denser matting paint with a heavier gum content. This was then rubbed
vigorously to create pronounced textures in the paint, which were then further
worked using hog's hair brushes, quills and needles. This paint style, combined
with the rich antique glasses used in the Arts and Crafts period, resulted in
some very free, expressive and at times dramatic stained glass. To convey the
desired effect to the glass painter these designers tended to draw up their full
sized cartoons (working drawings) on textured cartridge paper using charcoal
which gave some similar effects to the paint style.
Victorian studios would not restrict themselves to just one trace paint and one
layer of matting paint. Sometimes they used a vinegar trace overlaid with two
water and gum arabic matts (the second matt just starting to lift and blend with
the first matt) and then a lavender oil matt laid over the top of the two water
matts. Few glass painters employ such a bold and confident attitude to glass
painting these days, and with modern kiln technology and relatively rapid firing
times consider it safer and more expedient to fire the glass at the various
in-between stages.
Saturday, June 20, 2009
How to Accomplish a Decrepit glass Aftereffect Halloween Cardboard Lantern
How to Accomplish a Decrepit glass Aftereffect Halloween Cardboard Lantern
Make a admirable decrepit bottle aftereffect Halloween Lantern, a admirable Halloween adornment for any room. Fabricated from a cardboard lampshade which will fit and beam light. Back the ablaze is switched on you see the abounding aftereffect of the decrepit bottle effect. Halloween Lanterns are a abundant another to pumpkins or Jack o Lanterns.
To accomplish the decrepit bottle aftereffect cardboard lantern you will need... A brawl shaped cardboard lamp shade/lantern in any admeasurement you wish. Acquainted tip pens, atramentous paint.
You charge to actualize a architecture for the lantern. Draw the architecture on a area of paper. You could use Pumpkin Patterns to accord you some ideas. You can get about 3 designs on one lantern.
Once you are blessed with the architecture you can alpha assignment on the lantern itself. First you will charge to arrect the cardboard lantern. It should accept accumulation instructions with it. Unfold the lantern and admit a wire expander central the lantern, this slots into abode and keeps the lantern arrect and taught.
Take a atramentous acquainted tip pen or a brand and draw the architecture on to the cardboard lantern. Be accurate back you are accomplishing this because the lantern is fabricated of cardboard and the wet ink makes the cardboard fragile. If your pen does accidentally 'go through' stick a baby allotment of cardboard on the aperture to application it up and leave it to dry.
Once your architecture is complete, acrylic the accomplishments of the lantern black. This is so that the lantern blocks out some of the light. Again you charge to booty affliction not to break the paper. Use two brushes to acrylic the lantern, a attenuate besom for baby and abundant areas, and a blubbery besom for ample areas.
Top Tip - Acrylic from the top of the lantern to bisected way down, and leave to dry. Then about-face upside bottomward and acrylic the added half. Use a bowl to angle the lantern on, it stops it from affective and raises it up from the assignment surface.
For best results, accord the lantern two coats of atramentous paint
Once the acrylic assignment is dry, you're accessible to administer the decrepit bottle effect. With coloured acquainted tip pens, colour in the white areas of your architecture on the cardboard lantern. Again booty care.
Now adhere the lantern up from a beam ablaze in your home. Every time the ablaze is angry on your adorable architecture will afterglow like a decrepit bottle window in a church. The lantern is a fun and abnormal Halloween decoration.
A chilling tip: Use afterglow in the aphotic acrylic on your architecture so that back the ablaze is angry off, your chilling Halloween lantern will glow.
Do not use a college wattage ball in the lantern than adumbrated with the lantern instructions and packaging.
Glass Painting - Acrylic on glass
Glass Painting - Acrylic on glass
Have you anytime heard about bottle painting? Bottle painting is currently one of the fastest growing crafts in UK. The accountable bottle painting is so all-inclusive that one can aloof go on autograph about it.
Painting on bottle is altered from painting on a book. They are altered means to acrylic on glass, alignment from application acceptable oil paints to specialized bottle paints. Acceptable bottle painting is painting done on the apparent of a bottle sheet. This blazon of adjustment was followed to add minute capacity to faces and bend of accouterment which couldn't be added with the advance lines. Acceptable bottle painting is absolutely added of cartoon than painting.
Types of Acceptable Bottle Paints are
• Vinegar Trace Paint
• Matt Paint
• Silver Paint
• Oil based decrepit bottle paints
Glass Painting can additionally be done with paints that acclimated to acrylic added surfaces. Some of the best examples would be oil paints, acrylic paints, archetypal paints or auto paints. Bottle painting can be brushed by duke but air abrasion can advice you with more good results.
Glass Acrylic Instructions:
• Select the appropriate glass
• Apple-pie the bottle dry and abode it over the top of pattern. Trace the arrangement with a pencil with close pressure.
• Administer aqueous advance afterward the curve of the arrangement beneath the glass. It would consistently be appropriate to administer the advance from the centermost and assignment to outside.
• Mix stains and colors well. Consistently add aphotic colors to ablaze colors
• Blend and adumbration with bottle stain
How to apple-pie up Bottle Paints?
• Use a thinner or a cleaner to apple-pie brushes, eyedroppers or airbrushes.
• Use Lacquer abject bottle acrylic or Lacquer based clear acrylic to apple-pie off your hands.
• Lacquer Paints are the best advantage to pat dry your easily than a cleaner.
Friday, June 19, 2009
Wednesday, June 17, 2009


Tuesday, June 16, 2009
Monday, June 15, 2009
How to paint on glass
Glass paint is a transparent paint (with the exception of black and white which are opaque).
While there is water-based (acrylic) glass paint for children, artists usually buy solvent-based paints for a professional outcome. The solvent-based paints (such as "Vitrail") are durable after drying. The downside of solvent-based paints is the strong odour, which makes good room ventilation necessary while you are doing your artwork.
The paints are thinned and brushes cleaned with white spirit, - again a good reason for good ventilation by means of an open window or an extractor fan. Working outside is a nice option in beautiful weather.
Glass paint (as opposed to oil paint, acrylic paint, or watercolours) is very fluid and therefore needs to be contained within the intended painting areas on the glass. This is usually done using outliner which is acrylic paint out of a tube with a fine nozzle which helps to control the thickness of the line as well as the flow. Outliner comes in black, red, gold, silver, and lead-colour, all non-toxic and acrylic-based. The outlines have to be thoroughly dry before the design can be filled in with glass paints. Even after the painting is completed, the outlines will be susceptible to damage, and great care has to be taken when cleaning your glass artwork (- never use chemicals). Another possibility to contain the paint on the glass is the use of peel-off leading. The longest-lasting option though is using a self-adhesive lead-strip which you can bend into the required shapes and attach firmly to the glass surface using a pressing tool. The authentic look (or imitation of stained glass) is even more convincing if you attach the lead-strip on the reverse side of the glass as well. -A note of caution though: lead is toxic, so you need to always wash hands thoroughly before eating and even avoid touching your face or licking your fingers after you have handled lead! Very fine details within a design can be added lateron using a technical pen or a fine permanent marker.
Glass paints come in bottles. Please avoid shaking them, as it is difficult to remove the resulting air bubbles. Glass paints are intermixable only within their own range. That said, interesting effects can be seen when paints from different ranges of solvent-based glass paints are used together and refuse to mix completely. Also, mixing any colour with white on a palette will give you an opaque pastel effect which is quite attractive. But never try to mix water-based
acrylic) glass paints with solvent-based glass paints, it just won't work.
The paints should be applied on a horizontal glass surface, or else they will run out of their defined outlined areas. You start by using a brush and carefully applying paint around the inside edge of the outlined area. Then you can load the brush liberally with paint from the bottle and while avoiding drops swamp the centre of the intended area with glass paint.
adparams.getadspec('c_billboard1');
Then the paint should be allowed to settle flat within the defined area, which will create the desired stained-glass effect. Continue by painting all the areas meant for that particular colour before you change to another colour. (Clean the brush with white spirit.) Be careful not to paint too close to a freshly painted area if you don't want different colours running into each other. Any mistakes can be corrected using a cotton bud though.
Oh, and always try to keep your paint bottles covered to avoid the paint going dry. By the way, it would be good to carefully stir paints that haven't been used for a while, because the pigment might have separated itself from the solvent. But again, avoid creating bubbles.
Paints can be diluted by adding clear glass varnish (solvent-based). This takes the intensity and denseness away. While painting, you can achieve various effects, for instance, little blobs of dark colour within a lighter colour can be blended in with a feathering movement of the brush.
When the painting is finished, it should be stored flat and covered with a dustfree box and left to dry for at least 8 hours; it is even safer to call it 24 hours or more, depending on the thickness of the paint.
Another note of caution: If you paint on flat glass sheets, please be very careful not to cut yourself on the edges. Either have them smoothed for safety by your glazier, or attach some tape around them. Also, if the glass needs to be cut to size, it is wise to do that before painting, not afterwards, to avoid disappointment.
It is also interesting to paint on glass items: bottles, plates, glasses, etc., but please remember that after painting these can be used only for decorative purposes. Wash them only in cold water, and dry them carefully with a soft cloth. Vases, bowls, glasses, and other such glass objects need to be painted and dried in sections, laid on an old towel or soft cushion and turned only when completely dry.
Once the artwork is finished and can be admired against the rays of the sun or even candlelight, you'll be pleased to have tried it and eager to progress to do more.
The Art of Glass Painting
The Art of Glass Painting (Classic Craft Cases) /by Lisa
Telford;
Cheryl Owen.The art of glass painting is a craft which is both
satisfying and beautiful. Using the hardcover book and enclosed
paints and materials, you can master this skill to create many
exciting projects. Full color, step-by-step instructions will teach you
all the basic techniques, while more complicated projects will test
your new-found skills. Whether looking to create stunning additions
to your home or, perhaps to make a gift for that special person,
you'll find that the craft of glass painting offers a huge scope of
creativity. This classical box makes an innovative gift for the more
creative adult! The stylish box incorporates quality project
components with an informative full color book. The set is perfect
for adults wishing to learn a new hobby or skill or for people wanting
a gift idea for their more creative friends. All the tools and equipment
you need for the subject are supplied in the beautiful keepsake
boxes. Completion of the basic projects included will leave the
reader eager to tackle more advanced designs. The only limit to the
fascinating arts is your imagination! Box Size: 220mm x 175mm x 65
mm. Book Size: 220mm x 170mm, 128pp text. Full color throughout.
This craft kit is designed for an adult or an advanced child. It is truly
a wonderfully stocked craft kit enabling someone to become
seriously interested in the subject. The series is, in our opinion, a
very fine buy for the price.


